

Basic Survival Skills – The Five Most Important Skills to Master
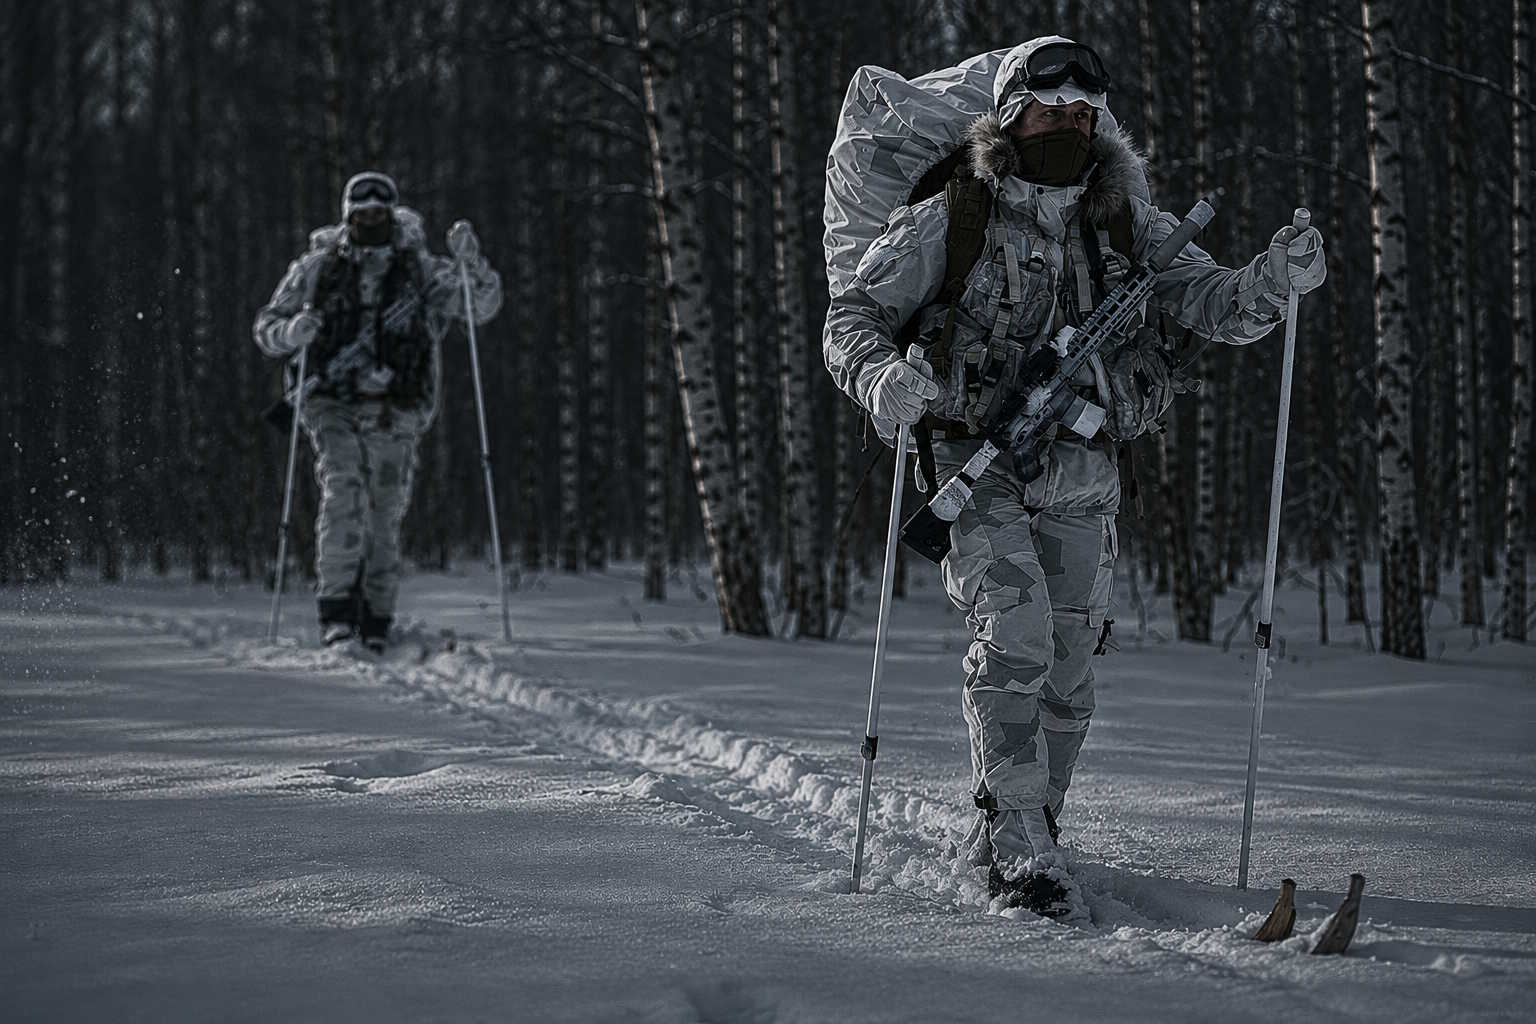
Survival memory card.
Your best defence in a survival situation is your ability to think clearly and make the right decisions.
Remember – STOP: Stop, Think, Orientate/Organize and Plan ahead
While planning and prioritizing remember the “rule of 3”. You will be able to survive 3 minutes without oxygen, 3 hours in extreme cold, 3 days without water, 3 mouths without food.
The priorities can also be divided in; Protection from the environment, Water & food – you can last 3 days without water and will need calories to maintain body heat especially in colder climates. In an emergency you will increase your ability to survive by mastering the 5 basic capabilities of survival.
1. 1. Fire
The ability to start and maintain a fire is the best one you can master. Fire will provide you with heat, light and comfort.
Even if you are lacking proper clothing a fire can give you enough heat for your survival. A fire will keep creatures as mosquitoes, predators and the creatures you imagine. You will often get a peace of mind and can accept your much needed rest.
A fire will cook your food and purify your water, especially handy if you want to reduce the risk of waterborne infections. The fire will help you dry your wet clothes; help you make different tools. It will also give you a mean of signalling at great distance by using flames or smoke.
Always carry and master 3 different methods of making a fire. With waterproof matches, lighter, fire steel etc, you will have the capability to make a fire in the most changing conditions. But practice attentively and become an expert.
2. Shelter
The first priorities are to find material that gives protection for your body against the elements i.e. heat, cold, rain, snow, sun and wind. 70% of the body warmth is lost through the head, which underlines the importance of putting on a warm hat if you are cold. The risk of heat stroke is reduced if you protect your head against the sun.
The hands with your fingers are your most important tools and they must be protected from cold, fire and infection prone wounds. Without hands there will be a significant reduction in the capability to sort out an emergency.
The first line of defence for the body is the clothing you chose to wear. The choice is incredibly important and needs to be made with caution with regards to the climate you are in. Use a layer-on-layer system of clothing to maximize your ability to adapt to changes in weather conditions.
The second line of defence is what type of shelter you can build yourself. Maybe you have a survival blanket or a poncho in your equipment that you can use. The shelter you build with equipment that you are carrying should be easy to put up and take down and then put up again if you’re on the move.
3. Signalling
Signalling gives you the possibility to contact people who can rescue you without having physical contact with them. There are different methods of signalling. These include the use of fire & smoke, brightly coloured clothing and signal panels, signalling mirrors and whistles.
A distress signal is usually constructed of 3 of any kind: 3 rifle shots, 3 whistle signals, 3 sticks formed as a triangle or 3 grab bags with the orange covers formed into a line. Your ability and imagination of signal methods can prove to be your life saver.
4. Water & Food
A person normally needs 2-3 litres of water every 24 hours. Heat, cold and increased physical activity all increases the need, up to 5 litres per 24 hours. Without water your performance will deteriorate quickly. Symptoms of dehydration are headache, dizziness, difficulty whit concentration. Dark foul-smelling urine is signs of dehydration.
Drink at least 2 litres a day, even if you are not thirsty. Drink small amounts, often, at least once an hour. With 0,5 litres per 24 hours, you can survive for up to a week. Do not drink urine, saltwater or milky plant fluid (except coconut milk).
Whenever you plan a trip, you should make sure you have some spare water and food to serve as your insurance, if you for some reason will be delayed. It is equally important that you learn how to ration your water and food as to know how to acquire new in the environment you are in. Boil all your drinking water does minimize the risk of getting a waterborne disease. Filtration and chemical purification are good alternatives.
Too meet the requirements of food supply, knowledge of traps, hunting and fishing are needed. Equally important are knowledge of eatable plants, mushrooms, lichen etc. are available in the area where you are.
5. First aid
Most injuries you will encounter are an abrasion, cuts, bruises and burns etc. Make sure you treat these injuries carefully to avoid infection. Always carry some sort of medical kit and learn the basics of self-treatment. Daily personnel hygiene is one way to reduce the risk of diseases. In case of more severe injury you will need assistance, do your best and focus on the basics. If you have completed medical training (ADCDE & CPR) and act accordingly, you will have a better chance to deal with an emergency with injured people. Panic is your worst enemy in an emergency. You will find a first aid memory card in most medical kits.
Practice and maintain your abilities
Any survival skills you developed during the years will serve you well in a emergency situation. When you face a real situation, they will come in handy, and you will be prepared for the fight for survival. Whit some knowledge you also will have a better mental preparedness for ordeals you can experience.
The 5 abilities
Fire. Start by collecting an ample supplied of burnable materials before starting the fire. Find a place that protects your fire, from wind and rain (snow). Find or build something that reflects the radiation energy. Make a “floor” of stones to increase the oxygenation of the fire as well as to keep it from spreading. Begin with preparing enough of tinder to start the fire. Use tinder such as birch-bark, dry grass, dry paper, a tampon, steel wool etc. You should also have enough kindling; small dry twigs, finely cut wood etc. and finally bigger pieces of wood. There is a old Indian saying – Indian make small fire, sits close and gets warm. – White man makes big fire, sits at a distance and keeps freezing. A smaller fire will also not consume a lot of firewood.
Methods of lightning a fire: Fire steel (Sparkie), lighter, matches, magnifying glass, a short-circuit battery, flint on steel. Another way is to rotate or rub a harder piece of wood against a softer piece of wood. When the friction produces heat more than 280˚C the wood (tinder in the wood) will ignite.
Shelter. The simplest and most mobile shelter is some form of poncho or tarp. These can be erected over a framework or a rope. If a tarp is not available, branches of fir, larger leaves, snow etc. can be used to cover the holes in a frame to protect you from rain, snow and wind. Be careful if you plan to lean your shelter to a tree or large rock since these also are places preferred by snakes, spiders and ants.
Do not build your shelter on top of a hill since it will be exposed for the elements and be prone to have a poor water supply. Do not build your shelter in the bottom of a valley – risk of flooding and cold “runs” downwards etc.
In a desert the main purpose of a shelter is to protect from the heat. Build two shelters on top of each other. Build the first one approximately 45 cm over the ground, the second one 30-45 cm above the first. If you have dug a hole in the ground measure the distance from the bottom. The difference in temperature can reach 30˚C between the ground and the air above the shelters. Remember that the ground could be warmer than the air when the sun has heated up the ground over the day.
Snow is an excellent insulator. Whit in a snow hole an ambient temperature of around 0˚C is common. Do not remove the snow all the way to the ground since snow will provide more isolation than frozen ground. To further enhance the isolation, make a bed by sticking fine branches into the ground. A good rule is that when you think you have enough added one more layer whit the same number of branches.
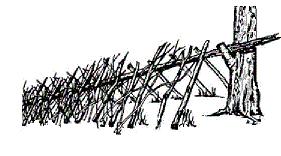
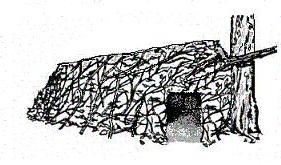
Signalling. Disrupt the normal appearance of nature. Create divergence that is easily recognizable. The most used distress signals are different combinations of three; 3 crosses on the ground, 3 garments, 3 orange backpack covers in a line. Another distress signal is a triangle put on the ground or letters. A large “I” (injured) signals that you have an injury. An “X” means that you cannot continue, and an “F” means you need water and food.
Hand signals. Move both hands from a position behind your back, over your head, and back again.
A Whistle gives a loud signal and puts less strain on your voice. Give 3 signals, pause for 1 minute, 3 signals, etc.
Signalling mirrors. Hold the mirror next to your face and locate the reflection on the hand of your extended arm. Aim on your target (plane, boat) by locating it between two fingers (V-sign) of your extended arm. If the pilot sees you and you clearly see that they have discovered you, stop signalling to avoid blinding the pilot.
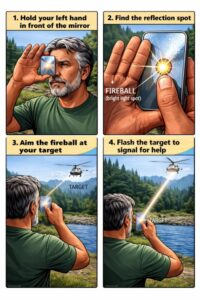
Laser. Use the same method as with a signalling mirror. But be aware that a laser could be mistaken for a hostile act if you are aiming against a military aircraft. Lights: Flash the light 3 times, pause for 1 minute, flash 3 times etc. Tie your LED lamp on a meter of cord and spin it in a circle to make a signal that is clearly visible in the dark.
Fire. Airplanes and helicopters pass fast. Always keep a prepared signalling fire ready to light quickly if needed. Good materials are juniper, tiers, upholstery from car seats etc. Use dark smoke during the day and light smoke during dusk in the nighttime. Build a frame construction above your fire that enables you to very rapidly through the prepared burning materials for making the smoke.
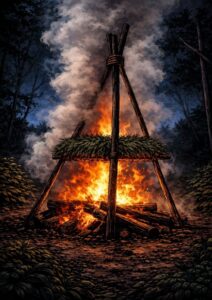
Bygg en tripod som lätt kan svingas in över elden och skapa kraftig rökutveckling
Signal panels. Use a red/orange signal panel. Let them at least be 45 x 45 cm. If a signal panel is not available use anything clearly visible e.g. aluminium foil.
Water & Food. Try to find running, clean/clear freshwater supply. Try to make a recce upstream of where you intend to take your water, to exclude the presence of dead animals, sewers, area of farming, industry or contaminated water. Animal paths commonly lead to water. An animal path is often narrow and winding. The roots are not rubbed on the top and there is waste on the path, unlike a human path. Dig 40-50 cm in the outside corner of dried upriver beds. Build contraptions to collect rainwater and lead the water to some sort of container. You could even fill a sock whit snow and hang it close to a fire and then let the snow melt and pour down thru the sock into a container.
Boil water at least 5 minutes. Water purification tablets need at least 30 min to 2 hours to have effect depending on what types of tablets used. Stagnant water can be purified by a combination of filtration, boiling and water purification tablets. Use clothing to collect water. By tying a t-shirt around your ankles and walking around in grass wet of dew you can collect water. Extreme temperature differences can make water to condensate on metal.
Condensation traps such as the “Sun well” can produce water. Start by digging a round pit that is 1, 2 meters wide and 0, 9 meters deep. Dig on places that you expect water to be collected. Place a container on the bottom, over this a sheet plastic with a stone in the middle. Make sure that the edge between the plastic and the pit edge are tight so the condensation cannot escape. To facilitate the collection of water from the container, put some tubing from the container to the edge. It will take approximately 2 hours for the condensation to start. By placing plant materiel in the pit, the condensation will improve. Another way of collecting condensation is to put a plastic bag over a bush.
Do not drink seawater. If you are on a beach, you can dig a sand well where the depth should be under the sea level. The sand will work as a filter. The further inland you build the well, the better the water quality. By heating up stones and lower them into saltwater you can use your cloths to collect the steam. Then just twist out the water from the clothing.
Certain plants can give you water. Most tree roots contain a lot of fluids. Avoid plants with milky or cloudy juices. You can chew on the core of the cactus root but do not swallow. A simple way to investigate if a plant is eatable is to rub some plant juice on the skin. If no reaction develops after 1 hour, rub some juice on the lips. If you after a couple of hours wait had not received a reaction swallow a very small piece and wait for one day. If you then do not get sick it is a very small chance of the plant being inedible.
Do not drink blood since it can be full of parasites or other microorganisms which could make you sick. Also make sure that you cook meat and fish properly before eating.
Movement in hot climate. The core temperature will rise in 3 different ways, radiation from the sun, hot air and the reflected heat from the ground. Stay in the shadow and wear your clothes including, shirt, hat and sunglasses. The clothing will reduce evaporation and hence dehydration.
Also make sure that you have something to cover your face within case of a heavy wind whit dust and sand. During warm weather, move at a slow pace and take a 10-minute break every hour. Move during the early in the morning or late in the afternoon and try to cover as much distance during the night to conserve water. To further reduce the water consumption, breathe through the nose and avoid unnecessary talking. Do not drink alcohol, since it will increase your fluid loss. Digestion uses fluids. Try to drink while eating. Do not ration your water too heavily if it is hot. If you are thirsty, drink. Carry enough water and take every opportunity to collect more.
In a humid climate it is important to at least once daily dry up your skin, especially the feet, to maintain the skin as a working barrier against infection. Try to sleep in a dry set of clothes if possible. In the jungle it is often impossible to move during the night. Move during the day but remember that dusk comes quickly. Keep this in mind and prepare a camp and light a fire before nightfall. When crossing streams, use a staff for support or use a flotation device e.g. a piece of wood, air filled trousers.
Movement in cold climate. In a cold environment you are dependent on heat generated from physical exercise or the use of endogenous heat production. It is of vital importance to conserve body heat. Damp clothing increases the heat loss. Adjust the clothing to your current exercise level, to produce as little sweat as possible. Make sure you have some dry clothing to put on when you reduce your level of exercise. Such clothing could be a warm hat, gloves, a scarf, a sweater, a pair of thick socks.
Dress according to the layer-on-layer method, where you try to put on several layers of clothing with insulating layer of air between each layer. The extra warm clothing should be kept dry as possible since it can be the different between life and death. Take every opportunity to dry wet garments.
The outer layer of your clothing system should be able to withstand rain and wind. In a cold environment you will lose a lot of fluids. Do not drink cold water, do not eat snow. Heat the water to at least “body temperature” to reduce the risk of diarrhoea etc. It also takes a lot of energy to heat up the cold drinks and food that comes down into the stomach.
Navigation. Make sure you know your direction and use landmarks for reference to avoid going in circles. It is easier if you use a proper compass to move in the right direction. Take a bearing, find a distant landmark and move towards the landmark. There are a few different methods to keep your bearing.
“The Swedish Compass” is a 3-5-meter-long pole kept horizontal in your hand while moving. Any changes in direction will be felt in the hand as a resistance. The sun rises in the east and sets in the west. By putting at stick in the ground and mark the end of the shadow in the morning (east) and in the afternoon (west) you can work out the north and south. It is in the middle between the two markings you have made.
The vegetation is usually denser towards the south; the exception is moss which grows on the northern side. Satellite dishes are on the northern hemisphere usually turned towards the south.
The pole star is found towards the north. The Big Dipper or Ursa Major consists of 7 bright stars, forming a dipper, a small pot with a long handle. In England it is often called “the plough”.
There are two distinctive star pattern constellations to look for when attempting to identify the pole star. The first constellation looks like a pan with a handle and is called the Great Bear or the Big Dipper. The end two stars are called the pointers, and these two stars aim at you towards Polaris or the Pole star. On the other side of the Polar star is a constellation that looks like a W. This is called Cassiopeia. If you can see this Cassiopeia constellation then you need to look for the pole star going upwards from the top of the W.
You can’t see the Pole star/Polaris at all if you are south of the equator, very close to the equator or in the southern hemisphere. And further down towards the equator, the lower on the northern horizon you will find the pole star.
Hunting and fishing. Study where to place your traps and snares. Natural paths often lead to a source of water. If you have found a source of water, you have increased your chances of succeeding with your hunting.
Try to channel the game towards your traps, snares, or ambushes. This can quite easily be done by building fences etc. Keep in mind that there might be predators in the area. Make sure that you do not become a target yourself. Check your traps often or keep them under constant surveillance to make sure that the catch does not fall into someone else´s hands.
Try to study your game. There are habits, size, etc. to make the best use of your traps and to plan your hunt as good as possible. Making a snare is a hard job if not done before.
Fishing can be done with different kinds of lures, e.g. a fly. Use your imagination and try to catch fish using a spear or net.
Regardless of what types of animals, you catch do not puncturing the intestines when slaughtering. Boil or grill the meat before you eat it.
Personal hygiene. Will reduce the risk of getting an infection and will make you feel better. If you have limited resources, focus on your hands, feet, armpits, groins, and teeth. Nurse your small wounds to keep them from getting infected. Remove small splitters. Trim your nails. Wash your hands after you have been to the toilet or been in contact with animals or other people. Be discreet to make sure you don’t offend anyone if you wash your hands after a handshake.
Stings and bites. Mosquitoes and ticks can transmit malaria, dengue fever, and other diseases. Flees can transmit Cholera, Typhoid fever, etc. Wear clothing that covers the full length of your arms and legs. Use mosquito nets to reduce the risk of acquiring vector-borne diseases.
Avoid getting close to wasp-/beehives. Learn what dangerous insects, spiders, snakes etc. live in the area where you are going. Locals and local medical personnel usually have knowledge about these matters.
Use a walking stick which can be used to move suspected objects. Check your clothing and shoes for spiders etc. before putting them on. Avoid damp places, since these often attract the above-mentioned creatures. Also check sleeping bags and beds before jumping in bed for ticks and spiders etc. Always pack your equipment and close bags when not using them. Inspect shady places whit your stick before moving into it, since it also is a good place for different creatures to rest in. If you have suffered a bite or sting it is important that you receive treatment as fast possible. Keep calm and still.
If you have been stung by a bee or wasp, the sting may be stuck in your skin. Sometimes you can see the “poison reservoir” attached to the sting. Remove the sting and reservoir carefully to avoid any more poison getting into the body. Use tweezers or a blade to carefully remove them. Apply protective dressing and see a doctor. If you have been bitten by a snake or a spider, keep calm and still reduce the spreading of the venom. Remove rings, watches, and other equipment that encircles the limb. After swelling it may be impossible to remove, and the equipment can further damage the affected limb by affecting blood circulation.
Remember your ABCDE (TTTC) and CPR training and be prepared to start CPR. Transport the injured to a doctor. Do not administer alcohol or cut up any swelling. Avoid contact between your hands and eyes, face or mouth after helping your friend since you may have traces of venom on your hands.
Contact the local population. The key to a god meeting is to be friendly, polite and have patient. To show fear, show weapons or perform sudden or threatening movements may cause fear and can lead to you being considered hostile. Many locals are shy, and it can seem impossible to establish contact with them. Approach slowly and smile as often as you can.
Use salt, tobacco, silver etc. discreetly when dealing with locals. Most people in the world know of money made of paper. Treat everyone with respect. Body language is often effective. Many cultures use body language as a way of communicating. Do not joke over someone else. Learn key phrases in the local language. Such a key phrase often “breaks the ice”.
Some subjects that are to talk about are considered taboo. In some cultures, females are not to be spoken to. Certain animals are not to be killed or eaten. Watch and learn as much as possible from the locals about their culture and habits. Ask for advice on local dangers and try to identify friendly and not so friendly people. If you find yourself in a hostage situation – use the same behavior as described above.
Back to Articles & News